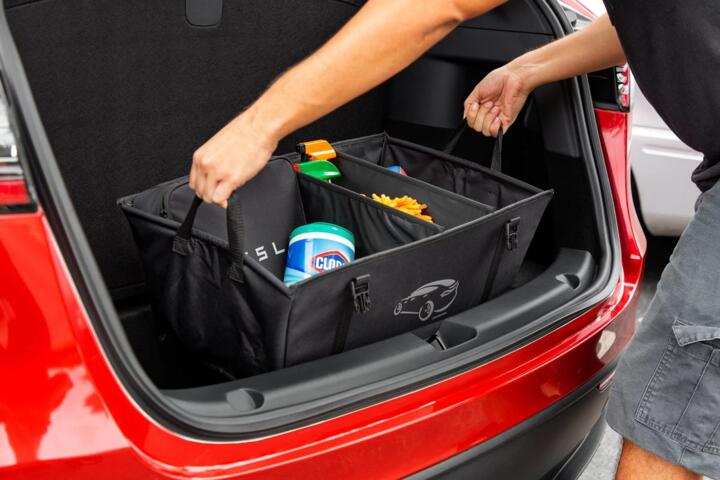
Cargo Organizers In Daily Use
A cargo organizer is a structured way to store items in a vehicle’s trunk, cargo floor, or back seat area so they stay where you put them. Instead of relying on friction from loose bags, it uses compartments, dividers, straps, or rigid walls to control movement during turns and braking. For daily use, the payoff shows up as fewer “where did that go?” moments and less time spent digging through a pile after errands.
In practical terms, a trunk organizer can act like a portable drawer system. A rigid base helps keep weight low and predictable, while side walls reduce lateral shifting. Many designs also include removable bins for items you grab often, such as a first-aid kit, jumper cables, or a roll of trash bags. When you park, you can open the organizer like a set of compartments rather than lifting everything out.
Some organizers also address noise and wear. Loose items can rattle against plastic trim, and repeated impacts can scuff surfaces. By separating items with foam or fabric dividers, an organizer reduces contact points. I’ve noticed that even a simple divider panel can cut the “shopping bag clatter” that happens on rough pavement, which is the kind of annoyance you only notice once it stops.
Common Pain Points And Misbeliefs
People often buy an organizer for one problem and then discover it doesn’t solve the rest. A common misbelief is that “bigger is better,” which leads to wasted space and awkward access. Another misbelief is that any organizer will stop movement; in reality, performance depends on how it anchors to the vehicle and how it matches the cargo shape.
Fit drives everything. A trunk organizer that’s too tall can interfere with the cargo cover or prevent the liftgate from closing fully. One that’s too wide can bow against side panels, which creates gaps where items still slide. Many cars also have different cargo floor levels between trims, and the organizer needs to match the actual floor geometry you use every day.
Anchoring matters because trunk floors are not flat everywhere. Some vehicles have tie-down points, rails, or hooks; others rely on friction mats or Velcro-like surfaces. If the organizer only rests on the floor without straps or a non-slip base, it may shift during hard braking. That shift can be small, but small movement is enough to make bins slide and lids pop open.
Supporting technologies include non-slip base materials, strap systems, and compartment geometry. Non-slip bases may use rubberized textures or woven traction fabrics. Strap systems can route through tie-down points or around the organizer frame. Compartment geometry controls how items stack: narrow bins work for bottles and tools, while wider bins work for groceries and folded gear. A version number on a product listing—like “v2.1” on a manufacturer accessory page—can hint at design changes, but it doesn’t replace checking the actual dimensions.
How To Choose And Set Up
Match Dimensions To Your Car
Start with measurements of the cargo area you actually use: trunk width between side panels, cargo floor depth from the seatback to the rear edge, and the available height under the cargo cover. Measure with the cargo cover in the position you normally keep it. If your car has a removable floor panel, measure both configurations because the organizer may sit differently. A practical target is to leave a small clearance for airflow and for the organizer’s base thickness, since compression can change fit.
For daily use, prioritize access. If you frequently grab items from the back seat area, choose an organizer that opens from the top or side rather than one that requires lifting the entire unit. If you carry groceries, plan for bag sizes and the “cold chain” reality: insulated bags often need extra height and may tip if bins are too shallow.
Anchor It So It Doesn’t Drift
Look for an organizer that uses tie-down points, straps, or a rigid base with a non-slip layer. If the organizer includes straps, route them to fixed points rather than to trim that flexes. Test stability with a simple method: load the organizer to a realistic weight, then push it by hand in multiple directions. If it slides more than a few millimeters, it will likely shift under braking.
Some organizers use friction mats instead of straps. Those can work well on clean, dry floors, but they perform worse when the floor is dusty or wet. I’ve seen this in practice with muddy winter boots tracked onto the cargo mat; the organizer base loses traction and the bins creep. A quick wipe-down before loading can change the outcome.
Use Compartments For Grab-Order
Organizers work best when the compartment layout matches your grab order. Put “daily grab” items in the easiest-to-reach bin: gloves, a small flashlight, a phone charger, or a rain poncho. Put “rare grab” items deeper or in a less accessible compartment. For groceries, separate heavy items from breakables so bottles don’t roll into produce.
Use dividers to prevent contact between items that scratch or leak. A sealed bin for cleaning supplies reduces odor transfer. A separate compartment for pet items can prevent hair from spreading into other gear. If your organizer has removable inserts, label them with a simple marker on the underside; it speeds up reloading after a trip.
Plan For Weight And Access Limits
Even a well-anchored organizer can fail if it’s overloaded. Check the organizer’s stated load rating if it exists, and treat it as a ceiling rather than a goal. For daily driving, distribute weight across the base instead of stacking everything in one corner. When you load heavy items, keep them low to reduce shifting and to protect the cargo floor from point loads.
Access also affects safety. If the organizer blocks emergency access to a spare tire tool kit or a first-aid kit, it defeats the purpose. Many people add an organizer and forget the car still needs quick access to safety items. Keep those items in a location you can reach without moving the organizer.
Case Examples From Real Scenarios
Family Groceries With Less Rattle
A family with a compact SUV used a trunk organizer with three bins: one for reusable bags, one for bottles, and one for small items like snacks and wipes. Before the organizer, bags slid and bottles clinked against hard plastic. After switching, they kept bottles in a narrower bin with a divider and used the organizer’s non-slip base on a clean cargo mat. The family still used the same grocery bags, but the bins prevented lateral movement during turns.
The measurable change was less noise and fewer spilled items. They also reported faster unloading because the “snack bin” stayed in the same spot. The organizer didn’t stop every shift—one bin still moved slightly when the cargo mat was damp—but the overall behavior improved enough that they stopped using extra bungee cords.
Tools And Sports Gear Without Chaos
An apartment dweller who carried tools and sports gear in a hatchback used a organizer with a rigid base and removable top compartments. They stored frequently used items—gloves, a small wrench set, and a tape measure—in the top section, while bulky items stayed in the lower area. During loading, they placed heavy tools first, then filled gaps with lighter gear to reduce empty space.
The main lesson was that the organizer worked as a system, not as a single product. When they left the organizer partially empty, items shifted more because there was less structure to hold them. When they used the dividers and kept the bins filled enough to prevent rolling, the organizer reduced the “pile collapse” that happened on uneven parking lots.
Organizer Checklist And Tradeoffs
| Feature | What It Helps | Tradeoff To Check | Quick Test |
|---|---|---|---|
| Non-slip base | Reduces organizer drift on the cargo floor | Can lose traction when wet or dusty | Push the loaded organizer by hand in multiple directions |
| Straps or tie-downs | Limits movement during braking and turns | Adds setup time; straps can wear if routed poorly | Load heavy items and check for shifting after a hard stop |
| Dividers | Prevents contact and rolling | Can reduce usable volume if too rigid | Place two items that normally collide and verify separation |
| Removable bins | Speeds up grabbing items at home or store | Lids and handles can snag on cargo cover edges | Open and close with the cargo cover in place |
Decision support checklist for daily use:
- Measure cargo width, depth, and height with the cover set to your normal position.
- Confirm the organizer’s base thickness and whether it interferes with floor panels or hooks.
- Choose anchoring: straps/tie-downs for heavy loads, friction base for light, dry loads.
- Assign compartments by grab order, not by what fits best.
- Load a realistic mix and test for drift by pushing and by simulating braking with a safe, low-speed stop.
- Re-check access to safety items and emergency tools without moving the whole organizer.
Common Mistakes That Backfire
One frequent mistake is buying an organizer based on trunk volume alone. Two cars can share similar “liters” but have different floor shapes, tie-down locations, and cargo cover clearance. The result is an organizer that fits the brochure but not the daily reality.
Another mistake is ignoring the cargo mat condition. A non-slip base can fail on a dirty or wet surface, and the organizer then shifts, which defeats the purpose. Cleaning the cargo floor and mat before loading takes minutes and reduces the chance of bins creeping.
People also overload a single compartment. When heavy items sit in one corner, the organizer experiences uneven forces and can tip or slide. Distribute weight across the base and keep heavy items low. If you carry liquids, use sealed containers or leak-proof bags; organizers reduce spills from sliding, but they do not stop leaks.
Some buyers choose an organizer that blocks access to tie-down points or emergency gear. If you can’t reach a first-aid kit or spare tire tools without removing the organizer, you lose the safety benefit. A small layout change—like keeping a “safety bin” near the side—often fixes this.
FAQ
Do Cargo Organizers Prevent Spills?
They reduce spills caused by sliding and tipping by separating items and limiting movement, but they do not stop leaks from containers that are already compromised or improperly sealed.
Should I Use Straps Or Just A Non-Slip Base?
Use straps or tie-downs when you carry heavier items or drive on rough roads. A non-slip base can work for lighter loads on clean, dry floors, but it performs worse when wet or dusty.
Will A Cargo Organizer Damage My Trunk?
Most organizers use fabric or rubberized contact surfaces, but rigid frames can scuff trim if they shift. A non-slip base and correct fit reduce rubbing, and checking contact points during installation helps.
How Do I Choose The Right Size For A Hatchback?
Measure the cargo floor with the cargo cover positioned as you normally use it, then compare those dimensions to the organizer’s base footprint and height. Hatchbacks often have angled sidewalls that affect fit more than volume ratings.
Can I Use A Cargo Organizer With A Cargo Cover?
Many organizers work with cargo covers, but clearance varies by model and by organizer height. Test by closing the cover with the organizer loaded, since handles and lids can snag.
Author's Insight
Cargo organizers behave like restraint systems for everyday objects: they control relative motion between items and the vehicle. The most reliable results come from matching the organizer to the cargo geometry and anchoring it so it resists drift under braking. Non-slip bases help, but traction depends on surface cleanliness and moisture. If you treat the organizer as a layout tool—compartments for grab order and weight distribution—you get fewer spills, less rattle, and faster unloading, even without changing what you carry.
Key Takeaways
- Fit and anchoring determine performance more than advertised “capacity.”
- Use compartments for your grab order and separate heavy items from breakables.
- Test stability with realistic loads and check clearance with the cargo cover.
- Keep safety gear accessible and avoid blocking tie-down points.