Roof Racks: the Real Trade
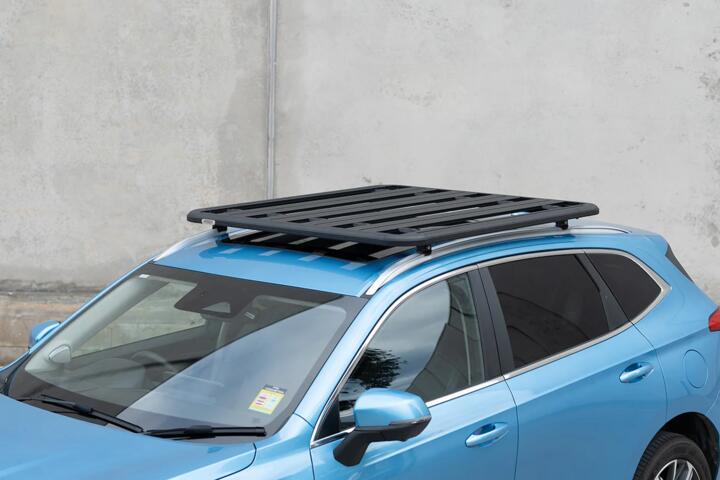
Roof racks are not just hardware on top. They affect aerodynamics, roof stress, and how safely cargo stays put during braking and crosswinds.
For a quick reality check, many crossbars and fairings can cut wind drag, but an unfaired rack still adds measurable fuel consumption. A common rule of thumb from fleet testing is that roof-mounted accessories can raise fuel use by roughly 1–10% depending on speed and vehicle shape.
Skip the “it fits the roof” assumption. Fitment errors can lead to loose clamps, misaligned load paths, and rattles that show up after a few highway miles.
Vehicle type matters more than many buyers realize. A 2-door coupe with a low roofline often has different crossbar clearance than a 3-row SUV, and a pickup’s bed rails change how you plan towing and cargo stacking.
Roof load limits also vary by model. Many passenger vehicles list a static roof load around 75–200 lb (34–90 kg), while some SUVs and crossovers allow more, and roof racks must stay within the vehicle’s published limit.
Skip guessing the load math. If you carry 60 lb of gear plus a 35 lb cargo box, you are already at 95 lb before straps, which can exceed the roof’s rating on some trims.
Common Buying Mistakes
People get tripped up by three areas: fitment, load rating, and cargo compatibility. The rack may mount, but the crossbar spacing might not match a bike tray, kayak cradle, or cargo box base.
Skip the “max weight on the box” trap. Rack and vehicle limits are separate, and the lower number wins when you calculate total load.
Another frequent mistake is ignoring roof clearance. A rack can add 4–8 inches (10–20 cm) to the vehicle’s height, which changes garage access and parking structures. If you drive a compact SUV like a Honda CR-V or a Subaru Outback, that extra height can matter more than you expect on tight ramps.
Consequences show up as noise, vibration, and faster wear. Loose clamps can fret against roof rails, and poorly aligned crossbars can stress mounting points during cornering.
Financially, mistakes cost twice. You may buy a second rack after discovering the first one won’t accept your cargo system, and you can also lose time on returns and re-installation.
Real-world example: a family planning summer trips with a roof cargo box often loads it with 2–3 weeks of clothing and tools. If the box is rated for 165 lb but the vehicle roof limit is 110 lb, the rack becomes the limiting factor, not the box.
Specific Ways to Buy Right
Match the vehicle fitment
Use the vehicle-specific fit guide from the rack manufacturer or the vehicle’s roof-rail system documentation. Why it works: correct clamp geometry keeps the load path aligned with the roof’s structural points.
In practice, a 2019–2022 Toyota RAV4 with factory roof rails typically uses a different clamp footprint than a 2016–2018 Mazda CX-5 without rails. If you mix systems, you may still mount, but the crossbars can sit off-level.
Tools help here. A 6-inch tape measure and a small bubble level make it easier to confirm crossbar height and spacing before you tighten everything down.
Outcome target: crossbars should sit parallel and not rock when you push down by hand. If they do, stop and re-check the mounting points.
Respect roof and rack limits
Check two numbers: the vehicle’s maximum roof load and the rack’s maximum dynamic load. Why it works: the lower limit governs, especially during braking and highway crosswinds.
For example, a Ford Escape may list a roof load around 100 lb (varies by year and trim), while a cargo box might list a higher carrying capacity. The rack system must still stay under the vehicle’s published limit.
Skip the “static only” misunderstanding. Many vehicle manuals specify roof load for static conditions, and real driving adds dynamic forces.
Outcome target: keep your total cargo weight at least 10–20% under the limit when you expect rough roads. That margin helps when you add wet gear, ice, or extra tools.
Plan crossbar spacing for gear
Bike trays, kayak cradles, and cargo boxes often require specific crossbar spacing. Why it works: the attachment points need enough support area to prevent bending and shifting.
In practice, a typical cargo box mounts to crossbars with a clamp pattern that expects a certain distance between bars. If your rack uses a different spacing range, the box may sit too far forward or rearward, changing stability.
Measure before purchase. Use a ruler to record the distance between your crossbars once installed, then compare it to the cargo system’s required range.
Outcome target: the cargo system should sit centered over the vehicle and not overhang so far that it interferes with tailgate opening or rearview visibility.
Choose the right mounting method
There are three common mounting approaches: fixed points on factory rails, clamp-on rails, and door-jamb mounts for vehicles without rails. Why it works: each method changes how forces travel into the roof.
Clamp-on systems can work well, but they depend on rail shape and tightness. Door-jamb mounts can be secure, yet they require careful alignment so the seals and latch points stay intact.
Personal aside: on a recent rack install I watched, the installer used a torque wrench set to the manufacturer’s spec, then re-checked after 25 miles. That small step matters because clamps settle.
Outcome target: after a short drive, the rack should not shift when you grab a crossbar and shake it. If it does, re-torque and inspect the contact surfaces.
Control noise and wind drag
Wind noise is not only about speed; it is about how air moves around the rack. Why it works: fairings and tighter bar profiles reduce turbulence.
In practice, a bare rack can create a whistle at certain highway speeds, especially on vehicles with smooth roof skins. A cargo box usually changes the noise pattern, sometimes reducing whistle but adding its own aerodynamic drag.
Outcome target: test at 55–70 mph (90–113 km/h) if you can. If you hear a new rattle, stop and check the end caps and strap tension.
Check clearance and access
Measure vehicle height with the rack installed, then compare it to your garage door and parking structure limits. Why it works: a roof rack adds height that you cannot “strap away.”
Real-world example: a mid-size SUV with a roof box can gain 6 inches (15 cm). If your garage clearance is 6 ft 6 in (198 cm), you may end up scraping the box on the first slow attempt.
Also check door and hatch clearance. On some wagons and SUVs, the rear hatch opening can be tight when the box sits far forward.
Outcome target: open the tailgate fully with the box installed, then confirm you can still reach the cargo area without hitting the box lid.
Plan for installation time
Installation time affects whether you actually use the rack. Why it works: a system that takes 45 minutes to mount discourages frequent use, and people then leave it installed year-round.
In practice, quick-mount systems still require careful alignment and periodic re-checks. A torque setting and a checklist help, especially if you swap between a cargo box and bike carriers.
Personal aside: I keep a small printed sheet in my glovebox with the crossbar spacing and the torque wrench setting. It saves time when the rack comes out for winter gear.
Outcome target: aim for a repeatable install under 20–30 minutes once you have done it twice.
Warranty and damage coverage
Read the rack warranty terms for corrosion, hardware defects, and damage from misuse. Why it works: roof racks see salt spray, vibration, and water intrusion at clamp points.
In practice, a warranty may cover manufacturing defects but exclude damage from overloading or improper mounting. That matters if you exceed the vehicle roof load or mount a cargo system outside the approved crossbar range.
Outcome target: keep your purchase receipt and take photos of the installed rack, especially the clamp points and end caps.
Mini Case Studies
Fleet vans and repeated returns
A small service company outfitted 8 vans for weekend job sites. They bought a universal clamp rack, then saw repeated returns because crossbar spacing did not match their ladder carrier base.
They switched to vehicle-specific fit kits and standardized crossbar spacing across all vans. The result was fewer re-installs and less downtime: each van lost about 2 hours per month to rework before the change, then dropped to roughly 20–30 minutes per month.
Cost estimate: if labor was $60/hour, the change saved about $1,000–$1,200 per month across the fleet. The rack cost increased, but the labor savings dominated.
Skip the “universal is cheaper” assumption. In fleet work, installation time becomes the hidden line item.
Family roof box and weight control
A family with a mid-size SUV planned three road trips per year. They used a roof cargo box but overloaded it with camping gear, then noticed increased wind noise and faster strap wear.
They re-weighed their typical load and compared it to the vehicle’s roof limit and the rack’s dynamic rating. After reducing total cargo by about 15% and using a load scale for each trip, strap replacement intervals stretched from roughly one season to about two seasons.
They also added a quick check after the first 25 miles of each trip. The result was fewer loose-end cap incidents and less time spent tightening on the roadside.
Outcome target: treat roof load like a budget, not a suggestion.
Checklist Before You Pay
| Check | What to verify | Why it matters | Quick method |
|---|---|---|---|
| Fitment | Year/trim-specific mounting points | Prevents clamp misalignment and rattles | Use manufacturer vehicle selector |
| Roof load | Vehicle max roof load in lb/kg | Lower limit governs with rack/box | Compare vehicle manual vs rack rating |
| Crossbar spacing | Spacing range for your cargo system | Prevents poor support and shifting | Measure installed distance between bars |
| Height clearance | Garage and parking structure limits | Avoids scraping and stuck vehicles | Measure total height after install |
| Noise test | Rattle and whistle at highway speeds | Loose hardware wastes time and can loosen further | Drive 10–20 miles, then re-check |
| Warranty | Corrosion and hardware defect coverage | Salt exposure is hard on clamps | Save receipt and photos of install |
Common Mistakes and Fixes
Buying a rack before confirming your vehicle’s roof rail type causes most headaches. It happens because listings show “fits” based on broad categories, but clamp geometry depends on rail cross-section.
Impact: the rack can sit crooked and loosen over time. Fix: verify the exact year and trim, then compare the clamp diagram to your roof rails.
Skip the “tight once” mindset. Vibration settles clamps, and many manuals call for a re-check after an initial short drive.
Impact: rattles and fretting marks on the roof. Fix: re-torque after 25 miles, then again after the first long trip.
People also underestimate how much the cargo box weighs. It happens because box marketing often highlights capacity, not the box’s own mass.
Impact: you exceed the roof load and stress mounting points. Fix: subtract the box weight from the vehicle roof limit, then weigh your typical contents.
Another frequent issue is ignoring child-seat compatibility when you plan family travel. It happens when buyers focus on roof cargo and forget that rear access and hatch clearance affect how quickly you can load a car seat.
Impact: more time at stops and more awkward handling. Fix: test rear hatch opening with the rack installed, then confirm you can access the child-seat anchors without fighting the box.
Finally, people forget that roof racks change fuel economy. It happens because the effect depends on speed, vehicle shape, and whether you add a box.
Impact: higher fuel costs on highway trips. Fix: compare your typical route speeds and estimate the change; even a 3–5% increase can matter over 3,000 miles.
FAQ
How do I know my roof load limit?
Check the vehicle owner’s manual for “maximum roof load” or “roof rack load.” The number is usually in pounds and kilograms and may vary by trim and whether you have factory rails. Compare that limit to the rack’s rating and any cargo box or carrier rating; the lowest limit governs. If the manual lists a roof load but not a dynamic rating, treat the vehicle number as the ceiling and keep a margin for rough roads and heavy cargo.
Do roof racks reduce fuel economy?
They can, because they add aerodynamic drag and sometimes create wind noise. The magnitude depends on speed and whether you run a bare rack or a cargo box. Fleet and testing data often show a range of roughly 1–10% fuel consumption increase for roof-mounted accessories, with higher impacts at highway speeds. If you drive mostly city miles, the effect may be smaller, but you still get added weight and airflow disturbance.
What’s the safest way to mount a cargo box?
Use the cargo box’s required crossbar spacing range and mount it to the rack points specified by the box manufacturer. Tighten clamps to the stated torque or tightness method, then re-check after a short drive. Load the box evenly and keep heavy items low inside the box. Avoid overhanging cargo beyond the box’s intended limits, and confirm you can open the tailgate without interference. If the box shifts when you push it by hand, stop and re-align.
Can I install a rack without factory rails?
Yes, but the mounting method must match your vehicle roof structure. Door-jamb mounts and clamp-on systems exist for cars without factory rails, yet they require careful alignment and good contact surfaces. If your roof has no mounting points, a clamp system may still work, but it depends on rail availability and roof skin shape. Follow the manufacturer’s fit guide by year and model, and inspect seals and contact pads after installation.
How often should I re-check roof rack hardware?
Re-check after the first short drive following installation, then again before each trip that involves highway speeds. Many manuals recommend a re-torque after an initial 25 miles, because clamps settle. After that, check end caps, strap tension, and any locking mechanisms every few weeks if you leave the rack on year-round. If you drive in heavy rain, salt, or rough roads, inspect more often, since vibration and corrosion can loosen hardware over time.
Author's Insight
Roof racks fail in predictable ways: misfit clamps, ignored roof load limits, and cargo systems that do not match crossbar spacing. Those issues show up as noise, shifting, and faster wear on straps and end caps.
On vehicles like a Toyota RAV4 or a Honda CR-V, the roof limit and rail design differ by trim, so “same model name” is not enough. Measure crossbar spacing after install, then verify it against the cargo system’s spec sheet.
For highway trips, plan for added fuel cost and clearance changes. A 6-inch height increase can turn a routine garage entry into a slow, careful maneuver.
Key Takeaways
Buy a roof rack by fitment and load math, not by “universal” listings. Confirm the vehicle roof load limit, then compare it to the rack and your cargo box or carrier ratings.
Next step: install the rack, measure crossbar spacing, and test tailgate and garage clearance before loading anything heavy.
Expect trade-offs: more wind drag, possible whistle at certain speeds, and extra time for installation checks. If you see clamp movement, persistent rattles, or roof contact marks, stop using the rack and re-check the mounting points.
Seek professional help from an installer or a dealership parts counter when you cannot match the rack to your roof rail type, or when the vehicle manual lists unusual load guidance. That’s the point where guessing becomes expensive.